Open topic with navigation
(continued from Print Cheques)
Output Documents/EFT
The output of payment documents is the same whether they are produced from Debtors or Creditors. This section of the Training Guide details the output of payment documents from both the Debtors and Creditors nodes of the Accounting application and covers the following:
- Print Remittances (Creditors)
- Print Cheque/Receipt (Debtors)
- Generate EFT File (Creditors and Debtors)
The selection screens enabling the filtering of which transactions are to be output, are almost identical for both printed and EFT output.
These functions are listed separately on the Accounting Tree Menu because internally, different messaging calls are made dependent on the document type being output.
In Creditors, documents can be output as part of the Cheque Creation process—(see AP–Cheque Writer), but Creditors pre-payment transactions and agent commission transactions must be printed via this process.
|

|
From the Print Remittances/Print Cheques screens, any type of payment document (with the exception of an EFT file) can be output—cheques, remittances, combined cheque/remittances etc. The Creditor Accounting Item Print Remittances does not preclude cheques from being printed, nor does the Debtors Print Cheques/Receipts preclude remittances from being printed. Which document type/format is output depends entirely of the message format the user chooses on output.
|
For both print and EFT output, selections can be made by Payment Type (Creditors) or Receipt Type (Debtors). This is the most visual difference on the selection filter screen. There are some subtle variances on the screen, mainly in the labelling of fields.
|
|
Remember, the more selections entered, the less data will be returned. Not all fields have to be completed—for example if transactions with a specific transaction date are to be output, then the Currency and the Transaction Date fields are all that need to be completed.
|
|
|
Where the From/To selections are being used, the To selection must be greater than the From selection.
|
Screen Shot 26: Common Payment Document Output Filter Screen
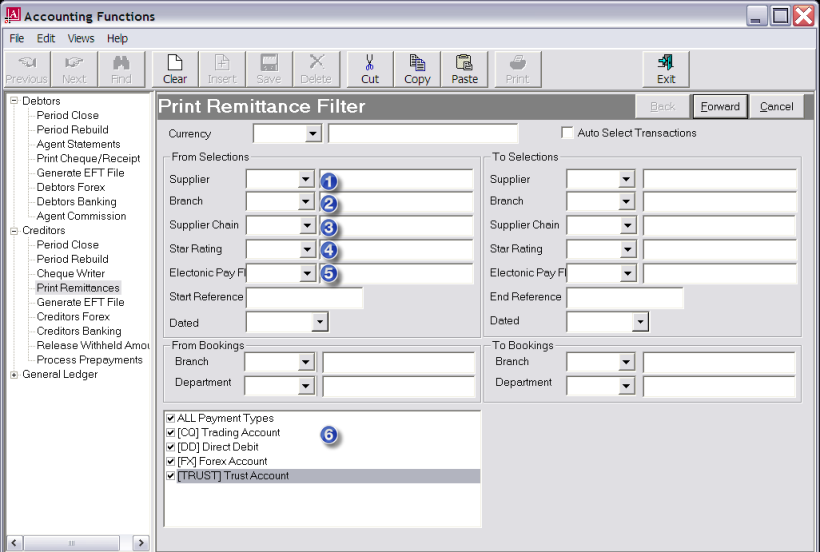
Currency (Drop-down, Required)
Select the currency of the payments to be made.
Auto Select Transactions (Checkbox)
Checking this box will result in any invoices matching the above filter selections also being tagged for payment. This may be overridden in the next screen.
From/To Selections
These selections can be used to filter the list of supplier invoices for inclusion in this Cheque Writer session.
|
|
Those fields which are labelled differently depending on whether Debtors or Creditors transactions are being output are numerically annotated.
|
 Supplier/Agent Code (Drop-down)
If a range is to be selected, the From/To range can be selected from the drop-downs.
 Supplier/Agent Currency Branch (Drop-down)
The branch which may be attached to the Supplier/Agent Currency. It is not the Booking Reference Branch Code. See Booking Reference Branch/Department below.
 —
— Analysis Codes 1, 2 and 3 (Drop-downs)
The three Supplier/Agent analysis codes.
Start Reference/End Reference (20 Char)
The start/end reference numbers of the transactions to be output.
Dated (Date)
The transaction date(s) From/To.
Booking Reference Branch/Department (Drop-downs)
Output can be based on specific or a range of booking branch/department codes.
 Payment/Receipt Types (Multi Select List Box)
Transactions that have a specific Payment (creditors) or Receipt (debtors) Type can be selected.
Forward
When selections have been completed, click the Forward button in the Wizard Bar.
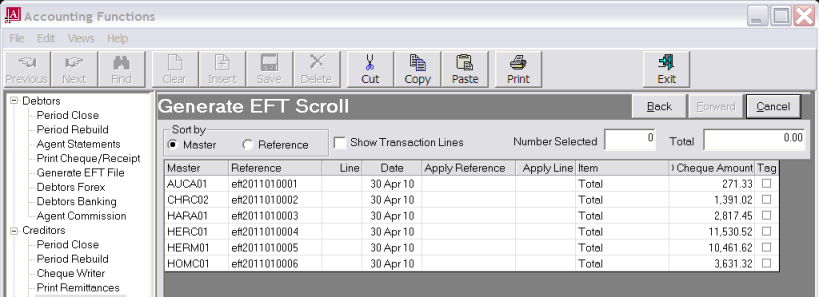
Screen Shot 27: Transaction Selection Scroll
|
|
This screen has the same columns and fields, regardless of the transaction type being worked with.
|
|
|
The column headings at the top of this scroll are the only headings available for this screen.
|
The scroll lists the cheque transactions that meet the selection criteria that were entered in the Filter screen (Screen Shot 26: Common Payment Document Output Filter Screen). The Radio Button/Checkbox across the top of the scroll can be used toSort By (Radio Button).
These radio buttons can be used to change the sort order on screen.
- Master. The sort order will be by the code in this column. They are either the Supplier Code or Agent Code, depending on whether creditor or debtor payment transactions are being worked with.
|
|
The term Master is used here to indicate that some codes may be Master Creditor or Master Debtor codes. This is dependent on whether cheques have been issued to Masters against non-master invoices.
|
- Reference. The sort order is by the (Cheque) Reference column.
|
|
The sort order can also be changed by double clicking the heading of any column.
|
Show Transaction Lines (Checkbox)
By default, Cheque Totals are displayed. Selecting this checkbox will display the individual lines which make up the total. See Screen Shot 28: Transaction Lines Scroll.
|
|
When transaction lines display, they are information only. I.e., it is not possible to show the transaction lines and then tag only one line of a multi-line cheque to print.
|
Number Selected (Display Only)
The quantity of items that have been tagged (selected) for printing.
Total (Display Only)
The total value of items that have been tagged (selected) for printing.
Screen Shot 28: Transaction Lines Scroll
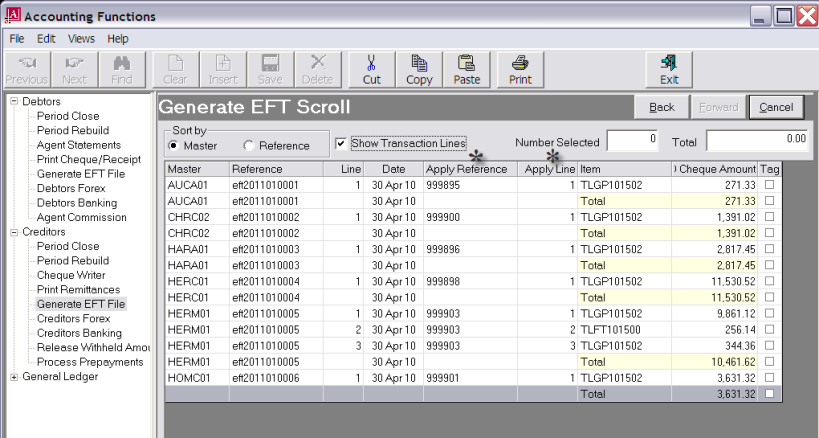
Columns marked * only have data in them when Show Transaction Lines is checked.
Master
The code of the Supplier/Agent that the payment is being made to.
Reference
The reference number of the payment (cheque) document.
Line*
The cheque transaction line number.
Date
The date of the cheque transaction.
Apply Reference*
The invoice number that the cheque payment applies to.
Apply Line*
The invoice line number that the cheque line number applies to.
Item
For bookings transactions, the booking reference. For non-bookings transactions, the invoice number. When Show Transaction Lines is not checked, this column displays Total against each transaction.
(CUR) Cheque Amount
The currency and amount of each cheque line (when shown) and the Cheque Total.
Tag (Checkbox)
Use the checkbox to tag cheque transactions to output. If the checkbox Auto Select Transactions in Screen Shot 26: Common Payment Document Output Filter Screen is checked, all transactions would be checked.
Print
To continue, click the Print button in the button bar.
Cancel
To cancel output, click the Cancel button in the Wizard Bar.
Back
To go back to a previous screen, click the Back button in the Wizard Bar.
When Print Cheques/Remittances is the Accounting application being worked in, the following is the dialogue box which displays when Print is clicked.
Screen Shot 29: Print Cheques Dialogue
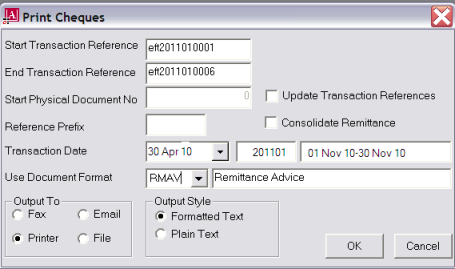
Start Transaction Reference/End Transaction Reference (20 Chars each)
These two fields will automatically fill with the start/end references that were selected from the transaction scroll screen.
Start Physical Document No (Numeric 20)
When left blank, the Start Transaction Reference value will be used as the Start Physical Document No. If a different start number is required—e.g., cheque documents were ruined by the printer and new documents were to be printed, then the new document start number can be entered here.
Update Transaction Reference (Checkbox)
When checked, the cheque reference number in the Start Physical Document No field will be written as the transaction reference. This number will overwrite the existing transaction reference.
Reference Prefix (5 Chars)
This enables a prefix to be added to the beginning of the cheque reference. An example of this is (e.g.) CHQ to differentiate between EFT payments and cheque payments.
|
|
The length of 5 characters for this field is included in the 20 character maximum of the reference field.
|
|
|
If a reference is added at this point and the Update Transaction Reference checkbox is checked, then the transaction reference will inherit the prefix.
|
Consolidate Remittance (Checkbox)
Checking this box will output one line (the transaction total) on the remittance advice rather than lines for individual payments.
Transaction Date (Redundant disabled field)
Use Document Format (Drop-down)
Select the required document format from the drop-down list.
Output To
A cheque document and/or a supplier remittance advice for this transaction can be output printer, fax, email or file.
|
|
Faxing requires a compatible faxing application to have been installed.
|
|
|
The required document format(s) (Cheque and/or Remittance Advice or Combined Cheque/Remittance) must first be set up in CodeMaint.
|
Output Style (Radio Button)
The default is Formatted Text. This means that the invoice document will be output in RTF (Rich Text Format) which includes graphics (if embedded in the document). Normal Text is designed to be used with Dot Matrix style printers which do not offer graphics support.
OK
To continue, click the OK button at the bottom right of the dialogue.
Screen Shot 30: Output EFT File Dialogue
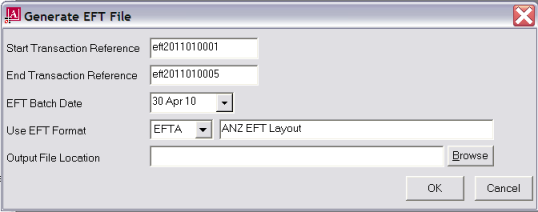
Start Transaction Reference/End Transaction Reference (20 Chars each)
These two fields will automatically fill with the start/end references that were selected from the Transaction scroll screen.
EFT Batch Date (Date)
This field defaults to today’s date. It can be changed and if the bank’s EFT format supports it, this date can be written into the EFT format as the EFT batch date.
Use EFT Format (Drop-down)
Select the required EFT format from the drop-down list.
Output File Location (Browse)
Clicking the Browse button will open the standard Windows Save File As dialogue and a file name can be entered and save location selected.
OK
To continue, click the OK button at the bottom right of the dialogue.
(continued in Period End Processes Index)
Open topic with navigation
